All Things Static: How to move any website to S3
There is a world where hosting popular websites costs less than $0.20/month. They always work fast. Uptime is perfect. No need to worry about getting hacked/spammed or update your CMS system.
These are called static websites. Beloved for their simplicity, they are gaining huge tractions in recent years. For example, the popular framework Jekyll is used by CTO of Amazon.
Why move your existing site
It may be tempting to start from scratch, but likely you have tons of content in your CMS and migration would be a huge pain. However, there is an easy way if you want just to archive the website and make your old content accessible. Just crawl the website like a Google bot and host the static files.
Some limitations:
- It works best if you do not plan to modify it later. Old blogs, landing pages, mostly legacy CMS stuff, etc.
- Only works with sites accessible without a login.
- You lose dynamic parts. No more comments, random pictures will always be the same. It may be a plus or a negative for you.
- There might be a minor tweak to your URLs. You can probably avoid them, but be extra careful if you care that, e.g., “/links” might become “/links.html”.
You may overcome the limitations, but it is better to take advantage of the system than fight with it.
Requirements
- Got AWS account. Can sign up for free.
- Got CloudFlare account and transferred your domain there. It is free and awesome.
- The instructions are for Mac and people who know how to open a terminal. You may need to do a bit of Googling for alternatives in case you have a different setup.
How to
1. Fetch the website and save it to disk using SiteSucker. Make sure that you pick “Localize option”.
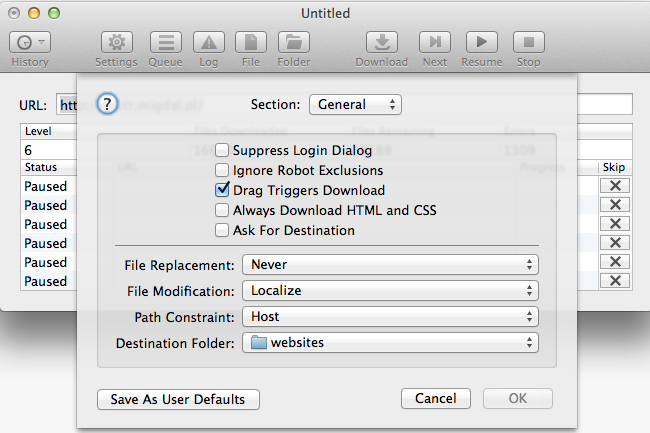
It may take a while, so feel free to go for a long walk.
Once you fetch it, make sure that you can browse it manually.
2. Create an S3 bucket with desired name in AWS S3 console (e.g. archive.example.com).

Allow AWS serve your content by using “Edit Bucker Policy” and setting it to:
{
     "Version": "2008-10-17",
     "Statement": [
          {
               "Sid": "AddPerm",
               "Effect": "Allow",
               "Principal": {
                    "AWS": "*"
               },
               "Action": "s3:GetObject",
               "Resource": "arn:aws:s3:::archive.example.com/*"
          }
     ]
}
Then click static website hosting and select “Enable website hosting” with index document as “index.html”.
3. Upload your website to S3. There are many ways to do that I go with command line s3cmd.
a) Install s3cmd.
b) Create IAM user for it in AWS IAM console. It needs S3 permissions to the bucket.
c) Configure it:
s3cmd —configure
d) Go to same directory you fetched the website and upload it:
s3cmd put -r . s3://archive.example.com/
Go for a really long walk ;-). After it finishes, make sure you can access the website at the address you can find in AWS S3 console on “Static Website Hosting” (see screenshot in step 2).
The url should look like: archive.example.com.s3-website-eu-west-1.amazonaws.com
4. Setup your domain on CloudFlare.
a) Pick your domain and got to DNS settings.
b) Add CNAME record. Key is your domain name e.g. “archive.example.com”. Value is S3 endpoint from previous step e.g. “archive.example.com.s3-website-eu-west-1.amazonaws.com”.
c) Wait for a while until DNS gets propagated.
Enjoy your new website on the new address!